Monday, December 26, 2011

The Day After Christmas

It's the day after Christmas,
The presents are gone,
The candy's still piled,
But everyone's done.

The dishes are calling,
Their mountain is too high,
The laundry is screaming,
"Clean me, clean me! Or I'll die!"

The floors need a scrubbing
And the kids won't stop fighting,
With toys everywhere
And many bolts need a'tightening.

So much to do this day after days,
So enjoy it all
Because the joy never stays.

Good luck with your cleaning,
Your kids and your candy.
May next year be similar,
So bright and dandy!


Ha! Merry Christmas, Happy Holidays, happy Chanukah, and best of all because I haven't missed it,

HAPPY NEW YEAR!

What are your goals for this next year?

Thursday, December 22, 2011

Homemade cough and cold syrup

Recently, my children managed to catch a horrendous cough leaving them miserable. Alas, after some googling, I found this cough syrup recipe on keeper of the home. Lemme just say that it works amazingly! I've made two batches now, and will probably never buy cough syrup again, simply because I learned that this homemade tasty stuff provides the same, if not more actually, amount of relief as robitussin would. (or so the kids' doctor says, and I believe it.). So, here's the recipe straight from Keeper of the Home.

Homemade Cough Syrup!

Ingredients:


-1 yellow onion

- Raw honey

No more than two tablespoons total of the following: (all are optional)

- Cloves - ground or whole - helps with pain relief

- Ginger - fresh or ground - helps with overall healing and circulation. (I imagine it might help if you're feeling queasy, but don't take my word for it in this syrup. Ginger is known to help nausea.)

- The original recipe suggested this too, but I haven't used it: "1-2 Tbsp. Comfrey or Slippery Elm (dried or powdered)- Comfrey is particularly good for healing, and Slippery Elm has more of a reputation for soothing and coating the throat"

Directions:


Step 1:

Chop onion and put into pan. Add any of the listed herbs now. (I also added half a clove of garlic because it is antiviral/antibacterial and will help out too.)

Pour honey into the pot until ingredients are covered fully.

Step 2:

Turn pot on very low and slowly simmer. Cover and stir occasionally. Let the herbs steep in simmering honey for about twenty or so minutes. Remove from heat.

Step 3:

Strain out onions and herbs. I used a coffee filter for lack of a better option. I poked a few holes in it with a tooth pick and rubber banned it around the jar for the syrup. I imagine cheesecloth would work well, as would, you know, a fine strainer. By the end of this process, there may be a few herbs in the syrup, which is fine.

Once the filtering is done, that's all there is to it! Simple, right? Jut stir win the fridge for as long as.. I haven't found a use by date for this recipe to be honest. So I imagine use it until it doesn't help anymore? (I would presume that to be when the jar is empty, but I'd make a new batch at least every six months to a year or so, just incase.)

Dosage:

1 tsp for children under 10

1 tbs for everyone else.

Also, I wouldn't give this to an infant because of botulism and honey, but the pediatrician I take my children to said it'd be fine in very small amounts. I'm not a doctor, so don't take my word for it and seek your doctors thoughts before administering to a child under the age of one.

All the best and happy cooking!

Tuesday, December 20, 2011

Taking a break until next week. :)

Happy holidays, everyone!

Friday, December 16, 2011

Day 16 Pinterest Challenge: Santorini

Man, I'd love to go to Santorini, Greece.  Why?

1.  Its on something called a caldera, which was once an island, but one of the largest volcanic eruptions in history changed that into this crecent like shape with a spot in the middle like this:

One day, the volcano will blow again.  The question is when.


2.  The place is just beautiful!  Not many things are prettier than a bunch of white buildings on the side of an island, right?  Ok, so maybe there are many things, but that doesn't make it any less awesome, especially in this picture:


3.  The history! That huge volcanic eruption I was talking about wiped out the Minoans.  Archeologists have uncovered some of their town called Akrotiri.  Who knows what else is buried on this island!


After the explosion, the Ancient Greeks came in.  They called the island Thera and it stayed that way for awhile, until the Peloponnesian war where the Athenians took over the island, who soon lost it to the Spartans in the Battle of Aegospotami.  Eventually, the Romans took over.  Soon after that, the Franks settled the island, gained indepence from the Ottoman empire, and became a part of Greece.

I love me some history!

Curious as to what I'm doing?  See the original post here.

Thursday, December 15, 2011

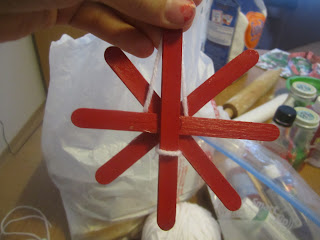
Day 15 Pinterest Challenge: Popcicle Stick Snowflakes!


A little over a week ago, some friends and I got together and made a few different ormanet crafts including the stained glass cookie ornaments as well as these awesome snowflakes!  Ok, so not that, but something like that link.  Something more along the lines of a 3 year old can do it.


Simple Snowflake Ornaments:

You'll need:

-Popcicle sticks
-Paint (We used acrylic paint. )
-Glue gun
-Accesories (if desired, like jingle bells, puff balls, glitter, ect.)
-Yarn or Ribbon

Directions:

Step 1:

Paint the popcicle sticks in multiples of four!  Simpe, right?  (This is the part a 3 year old can do.  And a 1 year old..  And pretty much any person in existence.)


Step 2:

Once the sticks dry, glue four of them together at the center like this:


Step 3:

Now would be the time to add any bling.  Once you've added all your bling and the glue has dried, its time to tie on the string.  Just follow the pictures and hopefully it makes sense.  I can't figure out how to explain it in words.

You go on the top of the... stick on top, and then tuc the string behind it.

Then you bring the strings infront of each of the two sides.

Here's a back view of what it should currently look like.


Then tie two knots.  one at the base of the snowflake, another at the end of the string.


Lastly, hang your awesome crafty ornament on your tree!  The kids loved making these, and I'm pretty sure everyone had a great time.


All the best and happy crafting!

Curious as to what I'm doing?  See the original post here.

Wednesday, December 14, 2011

Day 14 Pinterest Challenge: These are a few of my Favorite Things!

Today, I didn't have the chance to really do a new project (as I'm working on three of them already), so instead, I'll link you to all the awesome things I've found, whatever they may be.


First, lets talk about the Sons of Anarchy TV show.  It is probably one of a select few I absolutely LOVE.  I'm not sure if its the attractiveness of Jax, or the drama induced by the story line.  In summary, this show tells the story of a gang of sorts, or motorcycle club as they say, that go by the Sons of Anarchy.  As the story unfolds, you tend to get sucked in more and more as each season passes.  I haven't finished watching season 4 yet, but its on my list.

 I mean, come on.  What's not attractive about that guy? -->


While talking about TV shows, I must share another favorite.  Ever heard of Satisfaction?  Its an Australian soap opera about women (and a few guys for that matter) working in a brothel.  Sounds pretty, well, intense if I may use an appropraite word, and it is as intense as expected, but so worth it!  The drama is enticing, and I'm not sure anyone could pull off this show better than the Australians!  If you like drama, watch this show, but not around children.  I don't understand why they cancelled the show though. 


In other news, this backpack/stroller found its way to my wishlist.  Why would you not want a stroller that folds up into the size of a backpack and only weighs 9 pounds!


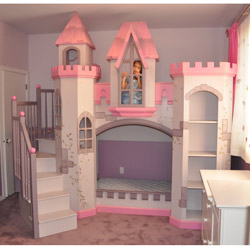
Lastly, I'd like to share the awesomeness of this princess castle bed.  The only reason I wouldn't buy it is the price.  I love my child, but that is just too much money I don't have.  Maybe one day I will take the time to build her one.  (Much MUCADH cheaper!)


Curious as to what I'm doing?  See the original post here.


(All the above images were found in google search.  None belong to me. )

Tuesday, December 13, 2011

Day 13: I Wish I Made this Dinner

Rarely ever does my family eat spaghetti.  It just isn't a favorite for anyone, including the children, so when they all requested spaghetti, I didn't know what to do other than the basic cook the noodles, pour a jar of sauce, and brown some meat.  Last night, I regret doing that because I totally could have done this pin instead!


I mean, come on.  What doesn't look good about a seasoned roll of bread stuffed with spaghetti?  Hopefully next time..

Monday, December 12, 2011

What happened to day 11?

It died.   

For those of you upset by a dead day, here's a pin about making moonsand.  Oops.  Cloud dough.  (Same thing though.  It feels EXACTLY like the moon sand you'd pay too much for at the store.)  We made some, and it was a very BAD BAD BAD idea.  Why?  Because I have a one year old who threw it all over the house in the span of ten minutes.  Definitely will make this when the kids are a little older though. 

If you don't feel like clicking a simple link, you just mix 8 cups of flour with 1 cup of baby oil.  Oh, if you're wondering, all baby oil is made of is mineral oil and fragrance.

Also, do not ever vacuum up moon sand.  It molds to the shape of the tubes.  (But, if you do, a bottle brush works well at getting everything out.  Especially if its one of those super flexible ones that bend in all sorts of crazy ways.)

Lastly, we put it in a rubbermaid container that would work as a sandbox.  For the three year old, this worked really well and most of the sand stayed in the box.

Sadly, I don't know how to color the sand.  Maybe the same way one would color the glitter salt?  Except, it is made of flour and baby oil.  And, no, the baby oil would not accept any of the color.  We tried.


So, lesson learned.  Do not make sand for a child who doesn't understand the concept of keeping things in one place.


 All the best and happy molding! 

Curious as to what I'm doing?  Check out the original post here.

Day 12 Pinterest Challenge: Glitter!


To celebrate this crafty Monday, have some homemade salt glitter!  I found this pin on pinterest and thought, "Hmm!  If I decide to preserve these stained glass cookies, this glitter would be a fun addition for decorating."  Sadly, we ate all but one that happens to be sitting on the tree calling my name, so that didn't happen, BUT the glitter will be used in all sorts of other projects in the future.  The best part?  This stuff is so easy to use and lasts about 6 months or so.  Some sites even said it kept well for over a  year.  Peresonally, I have no idea how long it will stay good for, but when I find mine has gone moldy/bad/unusable, I'll tell everyone.  I also imagine this would work well for coloring sugar, but don't take me up on that one.  If you try it with sugar, please share!  If I do, I'll share as well.  Anyway, here's how you make it.


Homemade Glitter


You'll need:


-Salt.  Lots of salt.

-Food coloring.  (The wilton gel ones work well!  As do those cheap drops, but I prefer the gel.)

-Aluminum Foil. 

-Pan to bake it on.


Directions:

Step 1:

Preheat oven to 350 F.

Pour about 1/2 or so cup of salt into a bowl.  Next, add food coloring and stir until the salt is one solid color.  Most recipes say add about 1/2 teaspoon.  I just used as much as I thought would make the color I wanted.  If you've used gel food coloring before, you know what I mean.)  A 2 cup bowl works good for 1/2 cup of salt, but any more and it kindof gets messy.  So, if you plan on making more than 1/2 cup at a time, use a bigger bowl.


The gel clumps up easily.  Just continue stirring or mush with your fingers until it looks like this:


Step 2:

Cover baking sheet with aluminum foil.  Then, spread the salt evenly on the sheet.  Ok, this isn't exactly even, but close enough.


Step 3:

Bake for 10 minutes in  preheated oven.  Let cool completely! 

After baking, it looks the exact same as it did in the oven.


Step 4:

Pour glitter into a container and store for however long you think/until it goes bad.  Great for use on anything that requires glitter.


              All the best and happy crafting!


Curious as to what I'm doing?  See the original post here.

Saturday, December 10, 2011

Day 10 pinterest challenge: Mod Podge

I really am lazy today, but I did want to share this awesome recipe for homemade mod podge I found on pinterest. And, it works really well, especially for making paper beads.

All you do is mix one part glue with one part water and shake well. Nothing to it! Just a simple 1:1 ratio.


Pinterest link:


Original blog link:


Enjoy!

Friday, December 9, 2011

Day 9 Pinterest Challenge: Bavaria


Bavaria, Germany:


When I decided I wanted to do Fantastic Fridays, I'm not sure where I was going with that.  Last week I talked of my home town, so this week it only seems fitting I talk about where I currently live.  The only problem with that is I don't even know where to start!  I'm currently in Germany and there's so much to do here its overwhelming.  I guess a good place to start would just be Bavaria.

 Here's a few places I want to go/have been and what makes them awesome:


Garmisch/Edelweiss lodge and resort:

This place is aboslutely beautiful.  While it is quite a long drive from where we are, the trip was worth it.  I'm not sure if the lack of kids made it all the better, but I'd love to go back here.  I'd also love to go hike up Zugspitze too, but that one probably won't happen.


Edelweiss lodge view

The Eagle's Nest:

This place kindof just turned out to be an old historical tea house with a golden elevator turned into a restaurant on top of a mountain.  I was a little dissapointed in the erasing of pretty much all the WW2 history other than the building of the road to it, but I guess if we would have taken the tour (that didn't start for another week or so), it would have been better and more historical, as we did go there for the history part and not the food part. 

Pretty cool place, nonetheless, though.  If you love hiking, I think you'll enjoy it.  There's a few trails around there going up and down the mountain.

The trail down the mountain

The tea house


Nuremburg:

I think that pin is of Nuremburg because I've seen it before, but I could be wrong.  Either way, this city is full of lots of awesome, a neat castle, several interesting markets throughout the year, and a world of fun.  You just have to go looking for it.


One of the cathedrals

The castle from the gardens


The city from the castle


Neuschwanstien Castle:

This has to be one of the most famous castles in the world.  While the outside is fantastic, the inside only has four of the rooms completed simply because the king died before he could complete it.  Also, this is the castle Disney based Cinderella's castle off of at Disney World.

I would LOVE to go here one day.  We are just waiting for mom-in-law and sis-in-law because we know they'll enjoy it too.

Favorite picture I found of the castle


Anyway, that's about it on this edition of Bavaria.  There's tons more to do and see around here, and I plan on it, so I'll share as I vacation around.  I'm sure I missed several awesome things in this area, particularly anything about Munich.

Have a great day and happy traveling!


Thursday, December 8, 2011

Day 8 Pinterest Challenge: Chirstmas Cookie Ornaments

For this wonderful Seasonal Thursday post, I thought these tastefully fun ornament cookies would make the perfect post. I used this recipe to the T, except I added a teaspoon of cinnamon.  The kids LOVED making these and the mess stayed pretty confined.


Stained Glass Cookie Ornaments


Ingredients:

-1/2 c butter

-1/2 cup sugar

-1/4 c brown sugar

-1 tbs molasses

-1/2 tsp vanilla extract

-1 egg

-2 c flour

-1/4 tsp salt

-3/4 tsp baking powder

-1 tsp cinnamon (my add)

-30 or so hard candies (We used jolly ranchers.  I read good things about life savers too.)

-parchment paper


Directions:


Step 1:

Cream butter and sugars until light and fluffy.   Next, add vanilla extract and molasses.  Mix well.  Then, add egg and mix until smooth.


Step 2:

Add the baking powder, salt, cinnamon and flour now.  Mix until its a nice cookie dough.  Refrigerate for at least an hour and no more than two days.


Step 3:

While the dough sits in the fridge, crush the hard candies into little pieces.  The original recipe suggests a mallet and ziplock bag.  I just used my awesome pampered chef chopper to chop it up, and it worked really well.  Be sure to keep the colors/flavors separated.  We also chopped up some nuts/chocolate chips to put along the outside of the cookies too.


Step 4:

Preheat oven to 375 F.

Roll the dough out on parchment paper.  I did it on individual pieces so each kid could make their own without it being a huge kid cluster.


Step 5:

Cut out the intended shape, and then a smaller version of the intended shape.  Remove the middle shape so that the inside is empty.


Step 6:

Fill the center with the candies.  Then, if you feel like it, add nuts and chocolate on the cookie dough part.

Also, don't forget to poke a hole in the dough for hanging on the tree!  Toothpicks work best.


Step 7:

Place parchment paper/cookies on baking pan.  Bake at 375 F for 9-10 mintues.  Candy should be fully melted and bubbly.  Cookies should be barely starting to brown.


Just let cool completely before removing from paper.  Once cooled, remove the cookie and tie a ribbon or some yarn through the hole and hang on your tree!  Edible and colorful!  Also, it will last about 3 or so weeks.

If you don't feel like eating them and want to keep them awhile, use some sealant like mod podge or shellack to keep them around for a few years.

Once again, even the kids enjoyed it!


All the best and happy cooking/decorating!


Curious as to what I'm doing?  See the original post here.

Wednesday, December 7, 2011

Day 7 Pinterest Challenge: Heart Shaped Crayons

This year, I promised myself that the majority of christmas gifts were going to be homemade, or atleast as homemade as possible.  So, when I started putting together their coloring books, I also began collecting broken crayons to turn them into fun shapes like on this pin.  Well, lucky me and some heart shaped silicon cupcake holders!  Here's how they turned out:


Fun Shaped Crayons!


You'll need:

-Crayons

-Silicon Molds

-Oven


Directions:

Step 1:

First, preheat your oven to 230 F.  Then, break all the crayons into little pieces, colorcode them if you wish, and put them into the molds.


Step 2:

Put the molds in the oven and bake for 15 minutes or until completely melted.


Step 3: 

Take out of the oven and let harden.  Once hardened, they just pop right out!


Simple easy stocking stuffer, gift, or even craft on a rainy/snowy day for kids! 

Happy Molding!


Curious as to what I'm doing?  Check out the original post here.